How to share a Google Form
Last updated September 2026 · ~9 minute read
Short answer: click Publish at the top right first — until you do, nobody can open the form — then click Share and Copy responder link. To send it to named people instead, type them into the same Share dialog and leave their access on Responder; switch it to Editor only for people who should help build the form. Google Forms has no QR code generator of its own.
Two things make this question harder than it looks. Google split the old single Send button into Publish and Share, so half the instructions on the web describe a button that is no longer where they say it is. And “share my form” means two completely different jobs depending on who is asking.
Step zero: publish, or nobody can respond
This trips people up more than anything else on this page. Google's own help article, Publish & share your form with responders, is explicit that “form creators must publish their form to enable responders to view the form or submit a response” — wording Google also used when it announced the change on 3 December 2024 (Rapid Release domains; Scheduled Release from 6 January 2025).
- At the top right, click Publish.
- To choose who is allowed to respond, click Manage.
- Confirm with Publish.
A form you have not published will hand out a link that goes nowhere useful. If you are troubleshooting “my link says I need permission”, start here rather than with the sharing settings. Opening the responder link yourself, signed out, before you hand it to anyone catches this and the access settings below in one pass — testing a Google Form before sending it walks through that check and the cleanup it leaves behind.
Route 1 — the responder link (the 90% case)
Google documents three places the same link lives, so use whichever you are nearest:
- Top right → Share → Copy responder link
- Top right → Preview → Copy responder link
- Once live, the Published button → Copy responder link
Want the short version? Google's page says to “click the box next to Shorten URL”, then
Copy. That gives you a forms.gle address — the same form, a link that fits on a
slide or a printed handout. It is a rename, not a different form: responses land in the same place.
Route 2 — email it to named people
Use this when you know exactly who should fill it in, and you would rather Google delivered it than pasted a link into your own mail app.
- Click Share.
- Enter the names of the people or groups.
- Leave their access on Responder (the dropdown next to each name).
- To have Google email them, tick the box next to Notify People.
- Click Send.
This is where the old Send button went: it is now the confirm button inside the Share dialog, not a control in the toolbar. Google's help page also documents an expiry on this access — Add expiration and Remove expiration — though it does not spell out the available durations, so we will not guess at them here.
Route 3 — embed it on a web page
Google supports this through Embed HTML, which hands you an iframe snippet
to paste into your site. It has its own sizing and styling traps, so it has its own guide:
how to embed a Google Form on a website.
Sharing for responses vs sharing for editing
This is the distinction that causes the most damage, because both live behind the same Share button and differ only by a dropdown value.
| Responder | Editor | |
|---|---|---|
| They can… | Open and fill in the form | Open the form builder |
| They see responses | No | Yes — all of them |
| They can change questions | No | Yes |
| Link you give them | The responder link | The edit link |
| Right for | Everyone you are collecting answers from | A colleague helping you build it |
If someone needs to help you build the form, Google's separate article Share your form with collaborators is the one you want: open Share, enter their email, click the down arrow beside their name and choose Editor. Handing over the form for good is a different action again — Transfer ownership, from the same dialog under People with access.
The failure mode to avoid: pasting your browser's address bar into an email. That URL is the edit link. Anyone who opens it can rewrite your questions and read every answer already submitted. The responder link is the one behind Copy responder link, and it always looks different.
Does Google Forms make a QR code? No.
Worth stating plainly, because a great many articles imply otherwise. Google's help page for publishing and sharing a form lists the responder link, Shorten URL, email notification, Embed HTML and pre-filled links — and never mentions a QR code. Neither does the collaborators article. The only QR material on Google's own domain sits in community threads where people ask how to make one; that is users asking, not a documented feature.
So every QR code you have ever scanned that opened a Google Form was generated somewhere else, from the responder link. Practically, that means one of:
- a free web QR generator — fine for a one-off, though many of them wrap your link in a redirect that can expire or start charging;
- your own tooling, if you have any;
- an app that does it against the form directly.
Sharing a form from an iPhone
Google ships no dedicated Forms app for iPhone or iPad, so the routes above assume you are at a desktop browser. Forms+ is a native iOS client for your real Google Forms, and puts the same distribution decisions into one sheet — Share & Distribute, grouped into Send it, Print & display, Advanced and Manage & Publish.
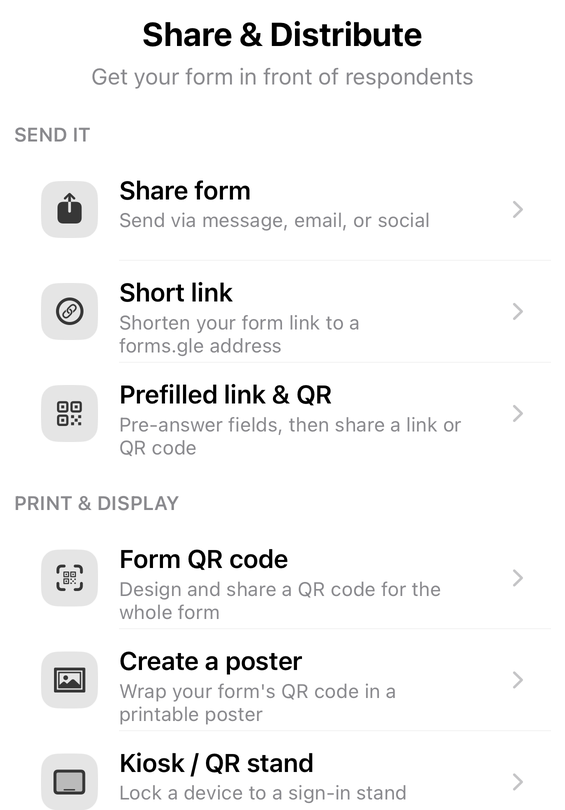
What that sheet holds, in the order it draws it. Several rows are conditional, so each condition is named rather than left for you to discover by not finding the row:
- Send it ▸ Share form — “Send via message, email, or social”. The responder link into the iOS share sheet. Free, and always drawn.
- Send it ▸ Short link — “Shorten your form link to a forms.gle address”, the same Google short link as on the web. Not everyone gets this row. It sits behind the app’s newer-features flag, and several separate things can switch that flag off — your region, a remote switch, and, unless that test is itself disabled remotely, an install dating from before 2024. Where the flag is off the sheet has no Short link row at all and no amount of scrolling will produce one; the Send it group runs straight from Share form to Prefilled link & QR.
- Send it ▸ Prefilled link & QR — “Pre-answer fields, then share a link or QR code”.
- Print & display ▸ Form QR code — “Design and share a QR code for the whole form”. Opens QR Studio on the form link: presets, module shapes, colours, a SCAN ME banner, and a scannability readout that warns “Hard to scan — increase contrast” before you commit it to print.
- Print & display ▸ Create a poster — “Wrap your form’s QR code in a printable poster”, using the same saved design.
- Print & display ▸ Kiosk / QR stand — “Lock a device to a sign-in stand”, for an iPad on a desk at an event.
- Advanced ▸ Branded short link — “Create a memorable, on-brand short URL”. A different feature from Short link, not a duplicate of it: it would mint your own custom address rather than ask Google for a forms.gle one. It does not work today. The row is always drawn and carries no cohort condition, but the link backend it needs has never been switched on, so the screen opens on a panel headed “Not enabled yet” with the Create button disabled. We list it because it is on the sheet, not because you can use it.
- Manage & Publish ▸ Manage access — “Who can edit and respond”: an Accepting responses switch, a Responders & editors list where people are added as Add as editor or Add as responder, and Copy edit link kept deliberately separate from the responder link.
- Manage & Publish ▸ Publish form / Unpublish form — the same publish state described at the top of this page, mirrored on the phone. These two are alternatives: Publish form is drawn only while the form is still a draft, and Unpublish form only on a published form that can be taken back down, so you normally see one of them.
Sharing the form, managing access and publishing are free. The rest of this sheet is the paid tier — QR Studio's export, the prefilled link & QR, kiosk mode, Short link and Branded short link — and the app marks those rows with a padlock rather than walling you at the end. Do not read the absence of a padlock on a row we have not named as a promise that it is free; check the row in the app.
Limits and restrictions worth knowing
- Who can respond. Set before publishing, via Manage. Google announced on 3 December 2024 that creators can limit response access to specific users, groups or target audiences rather than the old all-or-nothing choice between your domain and the public web. At launch it applied to newly created forms only; Google said on 29 January 2026 that all existing forms would be upgraded to the same controls.
- One response per person. Settings → next to Responses, the down arrow → turn on Limit to 1 response. Google's page attaches a condition to it: “to access and fill out the form, users must sign in to their Google Account.” That is the trade — it rules out genuinely anonymous responses. If that matters, see making a Google Form anonymous.
- Closing the form automatically. Google announced on 12 January 2026 that a form can stop accepting responses at a set date and time, or after a set number of responses. It is off by default and enabled after publishing. More in scheduling a form to open or close and limiting the number of responses.
- Unpublishing. Taking a form out of the published state takes the responder link offline, which is a heavier action than simply closing responses — anyone with the link, including a printed QR code, hits a dead end.
Which route do you want?
| You want… | Use |
|---|---|
| A link to paste anywhere | Share → Copy responder link |
| A link short enough to print | Tick Shorten URL → forms.gle |
| Google to email named people | Share → names → Responder → Notify People → Send |
| Someone to help build the form | Share → their email → Editor |
| To hand the form over entirely | Share → People with access → Transfer ownership |
| It on your own web page | Embed HTML |
| A QR code for a poster or table | Not in Google Forms — a QR generator, or Forms+ QR Studio |
| Only certain people to respond | Publish → Manage → restrict to users, groups or audiences |
Share, QR and publish — from your phone
Forms+ puts the responder link, a designed QR code, posters, kiosk mode and access management in one sheet, on your real Google Forms and your own Google account.
Get Forms+ free on the App StoreFrequently asked questions
Where is the Send button in Google Forms?
Sending is now split in two. Google's current help page documents Publish at the top right to make the form live, and Share to hand it to people. Send survives as the confirm button inside the Share dialog once you have typed in names or email addresses.
Does Google Forms have a QR code generator?
No. Google's help page for publishing and sharing a form documents the responder link, Shorten URL, email and Embed HTML, and never mentions a QR code. Every QR code for a Google Form is made outside Forms, by pointing a QR generator or an app at the responder link.
What is the difference between the responder link and the edit link?
The responder link opens the form to be filled in. The edit link opens the form builder, with every question and every response behind it. Sending the edit link to respondents by mistake is the single most damaging error in sharing a form.
How do I let someone else edit my form?
Open Share, enter their email address, and set their access to Editor rather than Responder. Google documents Transfer ownership in the same dialog, under People with access, if you want to hand the form over entirely.
Can I stop people responding without deleting the form?
Yes. Turn off response collection, or let Google close the form for you: since January 2026 a form can stop automatically at a set date and time, or after a set number of responses. Unpublishing takes the responder link offline entirely.